Getting started with JNI
Having introduced the principle of the Java Native Interface, we'll see how
to write our first native method. The stages are essentially as follows:
- create a C/C++ project that will build to a DLL (or dynamic library on
the platform in question);
- ensure the project includes the directories containing the JNI headers
in its build path;
- write the Java method signatures for our native methods;
- run the javah tool to create C header files from those method signatures
and add the headers to our project;
- based on those headers, write the native implementations of our methods
(in C/C++);
- compile the DLL or dynamic library;
- in the Java code, call System.loadLibrary() to link in the library at
runtime, then call our native methods.
Creating the DLL/library project
In Visual Studio, create a new Win32 Project. Then, in the Application Wizard
that appears, click Next to display the Application Settings, from
where you should select DLL as the application type, as illustrated below:
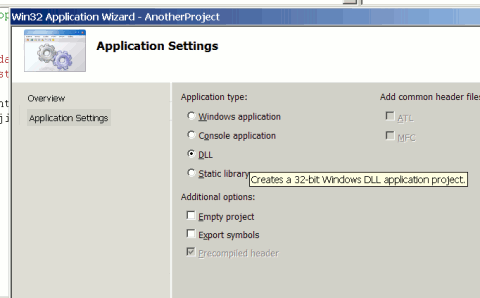
Selecting an application type of DLL from the Visual Studio Application Settings panel
of the Win32 Application Wizard.
Then, we need to tell the compiler where to find the JNI headers. These live
inside a directory called jdk/include inside the directory in which
your JDK has been installed. You need to include jdk/include and
also any subdirectory for the given platform, e.g. jdk/include/win32.
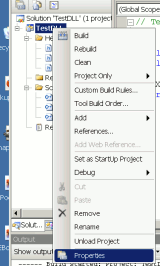
To add these to the compiler's search path in Visual Studio, right-click on the
project name in the project tree, then select Properties (see illustration).
Then, in the C/C++ General section, add the aforementioned
directories to Additional Include Directories as illustrated.
 |
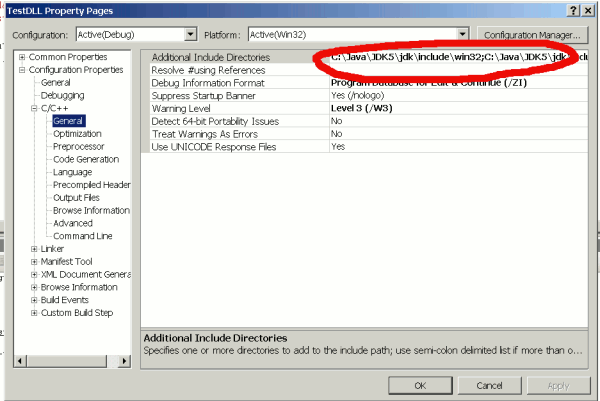 |
Adding the JNI headers to the compiler's include path.
Writing the Java method signature
Next, we write the signature of the method that we're going
to implement natively. This generally looks like a regular Java method
signature, but with the native modifier. Superficially,
the method is also like an abstract method in the sense that the
signature ends in a semicolon and there is no method body.
(But note that strictly an abstract method is one that will be
overridden.)
In principle, native methods can have the same signature as plain old
Java methods. For example, you can pass in Strings, arrays and other objects
to the native method. In practice, it is worth bearing in mind that
accessing object fields is slightly fiddly (though
perfectly possible) from native code; accessing primitives is
generally easier, and a good strategy for keeping the native code simple can
be to extract object fields from the Java side and pass them to the native
method as primitives. As our first example, we're going to implement a native method
that takes a number, doubles it and returns the result back to Java. Not
terribly exciting, but it will illustrate a few important concepts.
For our simple example, we create a Java project with a single class Test
inside the package test. To this class, we add a native static method
called getDouble() that will take an integer and return one:
package test;

public class Test {
  public native static int getDouble(int n);
}
Generating the header file
Now, we need to make sure that our DLL has a function whose signature corresponds
in a particular way to the Java method. As you get more experienced with JNI programming,
you can predict what the name will need to be. But to start with, it's easier
to use the javah tool supplied with the JDK.
The javah tool takes a given Java class and generates a C header
file that contains functions with the correct signatures for all of the native
methods defined in that class. For example, from inside our Java project's directory,
we can run the following command (obviously supplying the appropriate path to
the JDK as necessary):
C:\Java\JDK5\jdk\bin\javah -classpath . test.Test
If all is well, this will generate a file called test_Test.h that
contains among other things the following line:
JNIEXPORT jint JNICALL Java_test_Test_getDoubled(JNIEnv *, jclass, jint);
The header file will also contain some boilerplate code to include the JNI
headers and to ensure that if the compiler is running in C++ mode, it doesn't mangle the function names in the resulting DLL or library. For this reason, you should generally
not try and bypass the stage of including the header file in your C/C++ project.
To add the header file to the C/C++ project, copy it into the latter's directory,
and then add the header to the project in your IDE as appropriate. For example,
in Visual Studio, you right-click on Headers in the project tree,
then select Add > Existing Item.
Write the native method implementation and compile the DLL/library
Now, we need to write the C function that will be our native method
implementation. To do this, we first copy the function signature into a C/C++
source file. If you're using an IDE such as Visual Studio, it will probably
have created a default source file to which you can add the function.
In my example project called "TestDLL", for example, Visual Studio added
a blank source file called TestDLL.cpp. So I copy the above line into
TestDLL.cpp, adding names for the variables and a method body.
I also include the header file, because this in turn includes the JNI headers,
which we'll need to access JNI functions and data types. The
result looks as follows:
#include "stdafx.h"
#include "test_Test.h"

JNIEXPORT jint JNICALL Java_test_Test_getDoubled(JNIEnv *env,
           jclass clz, jint n) {
	return n * 2;
}
Note that the very first line (to include required standard
headers) was added by the IDE. The gubbinry of our function is the
simple line to return double the parameter n. Note that
two other parameters are passed into our function. We ignore these for
now, but potentially they provide various facilities such as a route
to accessing fields of defined Java objects and other parts of the
running "environment".
With a bit of luck, we should now be able to Build the project,
resulting in a shiny DLL file (or other library file depending on the
platform).
Including the library and calling the native method
Now finally from Java, we can call our native method. To do so, we
need to:
- make sure that the DLL/library can be found by the JVM;
- add a line of Java to include the library at runtime.
Placing the DLL/library in either the classpath or in a standard place
for the platform in question (such as C:\Windows\System or
/usr/lib/) is usually sufficient for the JVM to be able to find it.
Then, in Java, our main method looks as follws:
public static void main(String[] args) {
  System.loadLibrary("TestDLL");
  for (int n = 1; n <= 20; n++) {
    System.out.println(n + " x 2 = " + getDoubled(n));
  }
}
Note the call to System.loadLibrary(), which effectively takes
the file name of the library minus any platform-dependent extension such
as .DLL or .so.
With all the previous steps in place, our native method can then be
called just like any other Java method.
If you enjoy this Java programming article, please share with friends and colleagues. Follow the author on Twitter for the latest news and rants.
Editorial page content written by Neil Coffey. Copyright © Javamex UK 2021. All rights reserved.